Thursday, February 10, 2011

Chocolate Stout Cake

In honor of the fact that Philadelphia is much more filled with beer than New York seemed to be--at least for us, NYC was all about wine (have I told you about the awesome wine store we used to live near? I still miss it)--Anthony and I are now all about beer. In addition to drinking beer and attempting to brew beer (still in progress in our basement), we have also been baking with beer. I made a nice beer bread, which I didn't photo-document...but even more excitingly, beer-related desserts!

In this case, chocolate stout cake with chocolate stout icing. It's all about the beer and the chocolate, which are a delicious combination. The bitterness of the beer makes the cake not-too-sweet, which I think brings out the chocolate flavor instead of hiding it behind a wall of sugar as chocolate cakes often do. I adapted a Bon Appetit recipe for the cake (via Epicurious and Smitten Kitchen) and a random internet recipe for the icing:

Chocolate Stout Cake

(enough for one 9" or two 6" round cakes)

2/3 c. stout
2/3 c. butter
1/2 c. cocoa (dutch processed is best)


2 eggs
1/2 c. greek yogurt (homemade!)

1 1/3 c. flour
1 1/3 c. sugar
1 t. baking soda
1/2 t. salt


bake ~35 minutes at 350 degrees

Frosting

1 stick butter
1/3 cup cocoa
1/3 cup stout
powdered sugar
(enough to make the frosting the right texture. My base recipe called for 3 1/2 cups, I have no idea how much I used. Measuring how much sugar goes into frosting is just a recipe for feeling guilty about eating too much sugar, in my opinion)


To begin, slowly heat 2/3 c. stout and 2/3 c. butter in a small saucepan, and bring to a simmer. Add the cocoa powder, whisk to combine, and cool while you work on the next steps.


Whisk together the eggs and yogurt (sour cream works too, that's what the original recipe called for) together in a large bowl. Once the Chocolate/butter/stout mixture is cooled, add it to the egg/yogurt mixture. I like to be paranoid about the temperature in this step, to avoid the possibility of some sort of disgusting scrambled egg mixture being created with the addition of too much heat.


At this point the batter should be a delicious chocolatey-looking mixture, pretty smooth-looking. Don't worry about mixing too much, it should be well-incorporated.


Next, mix all of the dry ingredients together, then combine with the wet ingredients. Recipes often tell you to use separate bowls, but I usually find it works to mix the dry ingredients gently on top of the wet ingredients--then you have one less bowl to wash. At this point, don't mix too much. Beat the whole mixture together a couple of times with the whisk, then switch to a spatula and fold it together as gently as possible. Nobody likes a tough cake!


Next, pour the batter into your cake pan(s). This recipe fills two 6" round pans, which is what I used, or one 9" round. I like to butter the pans, line the bottom with a circle of parchment paper, and then put some more butter on top of that. It's sad when you have to mangle your cake just to get it out of the pan, and the layer of parchment really makes a big difference.

Place the pans in the center of the over, pre-heated to 350.  Bake until a toothpick or knife comes out clean, until the internal temperature reaches approximately 210 degrees, or for 35 minutes, whichever results in a cake that's done to your liking. Hey, despite all of the chemistry involved, baking is really more of an art than a science!


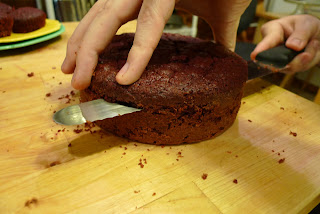
Let the cake cool in the pan for 10 minutes or so, then remove from the pan and cool to room temperature on a wire rack.  Finally, layer and frost your cake!  I like to cut each cake into two layers, using a bread knife. If you're careful, you can end up with fairly even layers--as you might be able to tell from this picture, I was not very careful. Obviously I should have had Anthony cut it instead, like I usually do.

To make the icing, simply soften the butter and mix with the rest of the ingredients.  This time you don't have to worry about over-mixing! Adjust the amount of powdered sugar as needed, depending on the humidity, how well you measure the wet ingredients...or how "soft" your butter ends up. I accidentally melted the butter completely, so I added a lot of extra sugar to try to make the frosting stiff enough to actually put on the cake without it oozing off. One of the advantages of having to add more sugar was that we ended up with some extra frosting at the end, which was delicious spread on graham crackers.

Then eat and enjoy! I would say that the reason there's no "finished" after picture is that the cake was so delicious that we ate the entire thing before I could take a picture, but that would be kind of disgusting. In real life I was just too lazy to take a picture at any time during the week and a half or so that we spent eating this cake.

Someday I'm going to post an actual healthy recipe on this blog, but dessert recipes are so much more exciting! Anthony and I actually do eat a lot of vegetables, generally. So far the Green Tomato Pie is still winning for the most vegetable-y recipe on this blog (if you count tomatoes as a vegetable not a fruit...), which is really a little sad. So stay tuned for some nutrition in the near future! Maybe.


Thursday, January 20, 2011

Easing back into the food blog...

So after a long hiatus (during which time I finished grad school classes and moved to a different city) it is the triumphant return of the food blog!  My camera is full of pictures of food, and sadly at this point I have no idea what any of the recipes were.  I can't even reliably remember which ones were delicious and which ones were not.  Except for the lamb stew, which will make an appearance sometime in the future if for no other reason than I want to cook it again.

So, to ease back into blogging, and to be lazy and avoid having to type out ingredients and measurements, this post will not be a new recipe. Instead I'm going to refer back to Jeff's post: A Salad Named Tuna, from June.

Pretty much immediately after reading that post, I had to try this tuna salad.  I'm not always a fan of tuna salad (or egg salad, or some potato salads...) because I find mayonaise is often inherently disgusting.  But not in this case!

So we pretty much followed Jeff's recipe, except we used fresh dill instead of dried dill (because we had it and it is delicious).

Jeff was definitely right, removing the water from the tuna was important.  I seem to remember that we bought some sort of fancy canned tuna, possibly because that was the only thing we could buy at our weird Manhattan grocery store, possibly because I was swayed by the fact that it promised I wouldn't be eating dolphins.  Who knows! But it ended up nice and dry (in a good way) and delicious.


This really is some sort of magical tuna salad recipe, because it is full of things I don't like on their own--mayonnaise, hard boiled eggs, celery...canned tuna.  But somehow combined it becomes magically delicious!


We decided to butter up the bread and add...some sort of cheese, maybe swiss? and make tuna melt/grilled cheese sandwiches.  This can be a messy process, as you can see the tuna tried to escape from the bread.


The end result was incredibly delicious. Writing this post and looking at the pictures makes me want to make it again...and I think I have some fresh dill in the refrigerator...

Saturday, June 12, 2010

A mini batch of lemon cupcakes with cream cheese filling

I really enjoy making cakes, but the problem with baking a whole cake is that then you have to eat it, which can take a while when you live in an apartment with only one other person.  I've tried to solve this problem by making tiny cakes (seen previously in my recipe for chocolate beet cake).  I have a whole backlog of tiny cake recipes and photos, which I'll eventually turn into an entry which will pretty much be an ode to the 6"x2" round Magic Line cake pan.

Two 6" round layers are equivalent to one 9" round layer, which is still a decent amount of cake.  So this time, when feeling the baking inspiration, I decided to make a tiny batch of cupcakes.  The cake recipe is based on the yellow cake recipe from The Cake Bible by Rose Levy Beranbaum.  The cream cheese filling is based on my vague memory of the last time I made black bottom cupcakes.


Cream cheese-filled lemon cupcakes
(makes a small batch, approximately 6 cupcakes)

Cupcakes:

combine in a medium bowl:
1 cup sifted flour
1/2 cup sugar
1 1/2 teaspoons baking powder
1/4 teaspoon salt

combine in a small bowl or measuring cup:
2 egg yolks
1/3 cup milk
1/2 teaspoon vanilla

Add 4 Tablespoons of very soft butter and half of the milk & egg mixture to the flour.  Stir to moisten the flour.  Add the rest of the liquid and beat by hand for a minute or two.

Stir in the zest from one lemon.

Filling:

3 oz. cream cheese, room temperature
1 egg white
1 Tablespoon sugar

Beat together with a fork until smooth.

Fill the cupcakes halfway, then drop on a heaping spoonful of cream cheese.  Top off with batter, to a total of 2/3 full, trying to cover up the filling as much as possible.

Bake for 20-25 minutes at 350 degrees.


My cupcakes ended up slightly overfilled, with the tops spilling over the edges; it might be better to make 7 or 8 cupcakes instead of 6, but I suppose it depends on the exact size of your pan.  These cupcakes aren't overly sweet--anyone with a real sweet tooth might prefer them frosted.  And really, you could make them into any other flavor of cupcake, as well--just replace the lemon zest with some other sort of fruit zest or extract.

Sunday, June 6, 2010

A Salad Named Tuna

I'm a bad, bad man. I have been meaning to post with the best of intentions, and yet, here I am, stranger to the world of the foodblog. However, with provident convenience, I come with amends in the form of tuna salad, which is hopefully not on the list of Foods Lisa Avoids With Vengeance (FLAW-V, not to be confused with its predecessor, Foods Lisa Avoids With Irrational Vengeance, or the next form, Foods Lisa Avoids With Vengeful Intent). But I digress. This is not about me. Well, it is, but it's really about a part of me, which is my love for tuna salad. I blame this weakness on my father, whose tuna salad is just too delicious. I remember being but a wee child (yeah, I busted that phrase out), with a roll stuffed to the gills with tuna salad. With a trophy like that I had no qualms about eating something the size of my face, and trust me: I have a big face. However, I don't just faceroll for any salad. A great salad is harmony, a tale of taste and texture and color that appeals to the senses. Put this way, plain, insipid salad ('I popped a can'--we've all been there) is a tragedy in three parts, the kind that's best left halfway through. So without further ado, I share the following recipe/technique as adapted from The New Best Recipe, poked and prodded by my own history--more complex than your 'pop and mix' common tuna, but worth the work.

Hearty Tuna Salad

2-3 Tbsp of lemon juice
1/2 tsp salt
1/2 tsp ground black pepper
1 tsp dried dill

1 small clove garlic, minced
1/2 small red onion, minced
3 celery ribs, washed and minced

3 cans of solid chunk tuna packed in water (no cat food. you know the type.)
5 hard boiled eggs (don't worry; I'll tell ya how)

1/2 c mayonnaise
1 Tbsp chopped fresh parsley

In a large bowl or container (the one you'll be storing your tuna salad in is fine), add the lemon juice, salt, pepper, and dill, and whisk together with a fork.

Get your eggs ready by placing them in a medium saucepan and covering them with about 1 inch of cold water (aka, if the eggs are at the bottom, there's roughly 1 inch water above the egg).
Turn the heat to medium high and let the water come to a boil (eggs inside, water should be bubbling vigorously, not simmering or simply forming bubbles). At that point, take the saucepan off the heat and cover, allowing the eggs to rest for about 10 minutes. When ready, remove the eggs from the hot water with a slotted spoon and place in a bowl with cold water. (If your saucepan is a simple metal saucepan with no nonstick coating, you can just carefully move it to the sink and run cold water over the eggs that way.)

While waiting for the eggs (water coming to a boil and then letting the eggs rest), chop your garlic, onion, and celery. Open up all of your tuna and empty the cans into a colander in the sink.

Using your hands, break the tuna down into finer pieces/shreds--just pinch away like St. Paddy's at the larger clumps and they should easily flake out. (If your tuna is green, you should seriously reconsider the whole affair.) Grab a handful of tuna and squeeze gently to remove more liquid (don't squirt yourself, which is surprisingly easy to do); add this to the bowl with the seasoning and repeat with the rest of the tuna. (Please, for the love of lunch, don't skip this process. A sloppy tuna is an unloved tuna; it's like somebody cried in your salad. More practically, it throws the flavor off and your bread will not be happy.)

Add the chopped garlic, onion, and celery to the bowl/container as well. Mix these together to distribute the seasoning evenly.

Your eggs should be decently cool by now; take an egg and remove the shell however you prefer. (Hammer not recommended, unless it's a Captain and then you're Very Very Lucky.) Slice in half, then each half into 4 wedges (lengthwise), then chop the wedges. However you do it, dice the egg. Do this for all 5 eggs. Add the eggs to the tuna mix and stir again; the yolk helps to absorb any leftover seasoning/liquid.

Chop your parsley and add it to the tuna mix with the mayo. Mix one more time! Taste and fine tune the seasoning. And you're done! Store. Devour. Faceroll.

(You can just eat the salad straightup, but if you're feeling Fancy, a good ol' tuna melt is just 15 minutes away--preheat the oven to 300F, grab yourself some bread, cheese (something akin to the Swiss family work work out fine) and tomato. Stack 'em in that order and give a good layer of tuna, bake for 10-15 and that's how it works.

Oh, and as is my tendency: here's the recipe cheatline: lemon juice, salt, pepper, dill + garlic, celery, onion + drained tuna + eggs + mayo, parsley. Yes. I made you read all that, first. Insanity is like tuna salad; it's made to be shared.)

Tuesday, February 23, 2010

Flashback to Florence

When I was in Florence for two weeks last summer (thanks NYU!) one of the nicest things we found was a restaurant off of Santo Spirito Square (name forgotten...).  In two weeks I ate there three times, and everything on the menu was wonderful.  One of my favorites, which I may not have ever ordered for myself--each entree was so gigantic and delicious that everyone at the table could take a taste--was risotto with zucchini and parmesan.  The risotto at the restaurant had some sort of delicious softy melty globs of parmesan cheese, but even without the melty parmesan globs Marcella Hazan's zucchini risotto definitely brought me right back to Florence.

Zucchini Risotto

2-3 large or 4-5 small zucchini cut into 1/2-inch slices
approximately 3 T chopped onion
1 clove garlic, finely chopped
2 T vegetable oil
2 T butter
2 cups arborio rice
1 cup broth + 4 cups water
salt to taste
1/3 cup freshly grated parmesan cheese


Put the chopped onion and 2 Tablespoons of oil into a large pot (we used our new dutch oven).  Turn heat to medium-high, and heat until the onion starts to become transparent.  Add the garlic and heat until it starts to color.  There's a lot of cooking still ahead, so err on the side of undercooking the onion and garlic at this point.


Next add the zucchini, and turn the heat to medium low.  Cook for about ten minutes, turning the zucchini occasionally so that they cook evenly.  Add a pinch of salt, and continue to cook for approximately 15 more minutes, until the zucchini turn a nice golden color.  While the zucchini is cooking, bring 1 cup of canned/boxed/whatever broth plus 4 cups water to a steady simmer in a pot right next to your risotto.


Once the zucchini is done, add one tablespoon of butter.  After the butter melts, add the rice and stir to coat it well with butter.  Turn the heat to high, and ladle in approximately 1/2 cup of simmering broth.  From this point on, stir constantly!


Scrape the sides and bottom of the pot to prevent the rice from sticking.  Whenever most of the liquid has been absorbed by the rice/boiled away, add another half cup.  If you run out of broth, heat up some more water and keep adding it to the rice.  The temperature in the risotto pot should be fairly high, so that the broth continues to boil when you add it to the risotto pot, but turn it down if it seems to be boiling away too quickly.


The risotto will be done when the rice is soft (not crunchy!) but still has a little bite to it--don't let it overcook into mush.  This should take approximately 20 minutes.  As it gets closer to done, add the broth in smaller increments so you don't accidentally end up with soupy risotto.  The goal is for a risotto that's still wet, but not runny and gross.


When the rice tastes just slightly underdone (approximately 2 minutes before it's done, according to Marcella Hazan--I guess you learn how to time it that exactly from experience?) stir in the second tablespoon of butter and the grated parmesan cheese, and stir!  Once it's cooked, remove it from the heat and add salt if needed.  I added at least a half teaspoon of salt, probably.  Don't leave this step out--the difference between under-salted and correctly salted was really obvious--all of the flavors become stronger, but it doesn't actually taste "salty."


Serve with additional grated parmesan on top.  Leftover risotto is significantly less delicious than fresh risotto, so eat up!  If you do reheat leftover risotto, be sure to add a little more water so it doesn't get dried out and gluey.  The internet tells me that you can make some sort of pancake out of leftover risotto, so perhaps that will be my next recipe!

Wednesday, February 3, 2010

Chocolate Beet Cake

What do you do with five pounds of beets? Obviously make them into cake.  This recipe (slightly modified) is apparently from Farmer John's Cookbook, but I found it in various places on the internet:

Beet Chocolate Cake:

4 oz unsweetened chocolate
3 eggs
1 cup vegetable oil
1 3/4 cups sugar
2 cups cooked pureed beets
1 T vanilla
2 cups flour
2 t baking powder
1/4 t salt

Bake at 375 F.


Begin by cooking enough beets to make 2 cups of puree.  We estimated randomly and ended up with the exact right amount, I advise doing the same.  Wash the beets, remove the tops and bottoms and any bad spots, and cut into quarters.  Place into a pot of water, and bring to a boil.  Simmer until the beets are soft (probably at least half an hour).  This probably removes all of the nutrients from the beets, but it's less of a pain than roasting them or cooking them in the microwave.

While the beets are cooking, melt 4 oz of unsweetened chocolate, broken into chunks, along with 1/4 cup of oil.  If you melt chocolate in the microwave, make sure to only heat it in short bursts and stir in between, or you'll ruin your expensive and formerly delicious chocolate.

After letting the beets cool a bit, remove the skins (pull them off if they come off easily, otherwise peel them).  Then puree!  A food mill works well; a blender or food processor would also do the trick.  And you are left with exactly 2 cups of beet puree.


Meanwhile, beat together 3 eggs and 1 3/4 sugar.  I recommend breaking the eggs perfectly in half:


Beat the sugar and eggs until they're fluffy, then mix in the remaining 3/4 cup of oil and the 1 T vanilla.  Next comes the most exciting part--adding the beets!  This actually is not a very exciting process, but will turn the batter into an exciting fuchsia color.


Mix for a while and enjoy the bright color, then pour in the melted chocolate.  I like to pour the chocolate in slowly because I'm always paranoid that the heated chocolate with cook the egg, and leave me with a batter filled with small pieces of scrambled egg.  There was a traumatic incident involving scrambled-egg-hot-chocolate when I was in college, that's all I want to say about that...but believe me, not at all delicious.


After the addition of chocolate, the batter continues to be an awesome purple/pink color that is somewhat disturbing.  Next, mix together the flour, salt, and baking powder, then add to the batter.  Mix just until the flour is incorporated, you don't want to overbeat the batter and end up with a tough cake.


After adding the flour, the batter should be a little lumpy, and now a weird purply-brown color, which means it's ready to bake!

Preheat the oven to 375F, and pour the batter into greased and floured cake pans.  I went with two 6" cake pans, plus a few cupcakes; the recipe would probably make at least one 9" round cake.  

Bake for approximately 40 minutes, or until a toothpick inserted near the center comes out clean.  Remove the cake from the oven and let it cool completely on a wire rack.


To make a layer cake, slice each cake horizontally with a bread knife.  Frost between the layers, and then cover with additional frosting.  Cream cheese frosting turned out to be delicious:

1 package cream cheese, softened
1/4 cup butter, softened
confectioner's sugar

Beat together the cream cheese and butter until smooth.  Add confectioner's sugar (at least 3 cups) until the desired frosting consistency is reached.  Add a small splash of milk if the frosting gets too dry.


If you want to feel like a giant, use a tiny spatula to frost your tiny cake!


Finally, this cake is best enjoyed in the sunshine, with a glass of milk.  The cake ends up slightly more red than a normal chocolate cake, and with the slightest hint of beets--although I'm not sure thatyou would immediately guess beets as the secret ingredient if you didn't know beforehand.

Sunday, January 10, 2010

Lisa's Swedish Pancakes


My favorite thing, after dessert, is stealth dessert: things that technically sort of qualify as a real meal, but are just as delicious as dessert.  In some cases these meals can involve some actual nutrition.  This is...sort of one of those cases, as long as you're convinced of the healthfulness of eggs and butter in large quantities.  You could think of these pancakes as being just like scrambled eggs, with a little milk and flour added, except that that makes them sound really disgusting.  And instead of disgusting, these pancakes are delicious.


The magic of Swedish Pancakes is that they are super-thin, and a little crispy around the edges, and very tender.  They're sort of like crepes, but much more eggy.  They're not particularly sweet, but they are an excellent vehicle for sweet things.

I once found the perfect swedish pancake recipe online, but then could never find it again. As a result I've tried several recipes over the years, with varying amounts of success.  This time I think I've finally figured it out!  This is sort of a combination of the my grandma's recipe (which was her mom's next-door-neighbor's recipe) and some other random recipes from the internet, based on several rounds of trial and error.

Lisa's Swedish Pancakes

4 eggs, beaten well
2 c milk
4 T butter, melted
1 T sugar
1 1/2 c flour

Combine all of the ingredients and stir well--don't worry about overmixing.  Stir vigorously while you add the melted butter to the milk/eggs, to avoid any premature egg-cooking.  The butter will sort of congeal and tend to float on top, so give the batter a good stir before ladling out each pancake.


Cook the pancakes in a non-stick pan, on medium-low.  I used about 1/3 cup batter in a 10" pan.  The secret of Swedish Pancakes is to make them very thin--after ladling in the batter, immediately pick up the pan and tilt it around to spread the batter across the entire bottom of the pan as evenly as possible.

Cook until the pancake starts to set and the edges start to look a little crispy, probably not more than a minute or two, then flip and cook for another minute or so.  Both sides should be sort of unevenly golden brown.  Roll the pancake around something delicious and serve immediately!


Swedish pancakes are good with a combination of sweet and tart flavors.  Lingonberry jelly with whipped cream (or canned cranberry sauce with whipped cream) is delicious.  We've also had them with black currant jelly.  As always, I also recommend replacing the whipped cream with greek yogurt.  Dust with powdered sugar, and enjoy!