Tuesday, February 23, 2010

Flashback to Florence

When I was in Florence for two weeks last summer (thanks NYU!) one of the nicest things we found was a restaurant off of Santo Spirito Square (name forgotten...).  In two weeks I ate there three times, and everything on the menu was wonderful.  One of my favorites, which I may not have ever ordered for myself--each entree was so gigantic and delicious that everyone at the table could take a taste--was risotto with zucchini and parmesan.  The risotto at the restaurant had some sort of delicious softy melty globs of parmesan cheese, but even without the melty parmesan globs Marcella Hazan's zucchini risotto definitely brought me right back to Florence.

Zucchini Risotto

2-3 large or 4-5 small zucchini cut into 1/2-inch slices
approximately 3 T chopped onion
1 clove garlic, finely chopped
2 T vegetable oil
2 T butter
2 cups arborio rice
1 cup broth + 4 cups water
salt to taste
1/3 cup freshly grated parmesan cheese


Put the chopped onion and 2 Tablespoons of oil into a large pot (we used our new dutch oven).  Turn heat to medium-high, and heat until the onion starts to become transparent.  Add the garlic and heat until it starts to color.  There's a lot of cooking still ahead, so err on the side of undercooking the onion and garlic at this point.


Next add the zucchini, and turn the heat to medium low.  Cook for about ten minutes, turning the zucchini occasionally so that they cook evenly.  Add a pinch of salt, and continue to cook for approximately 15 more minutes, until the zucchini turn a nice golden color.  While the zucchini is cooking, bring 1 cup of canned/boxed/whatever broth plus 4 cups water to a steady simmer in a pot right next to your risotto.


Once the zucchini is done, add one tablespoon of butter.  After the butter melts, add the rice and stir to coat it well with butter.  Turn the heat to high, and ladle in approximately 1/2 cup of simmering broth.  From this point on, stir constantly!


Scrape the sides and bottom of the pot to prevent the rice from sticking.  Whenever most of the liquid has been absorbed by the rice/boiled away, add another half cup.  If you run out of broth, heat up some more water and keep adding it to the rice.  The temperature in the risotto pot should be fairly high, so that the broth continues to boil when you add it to the risotto pot, but turn it down if it seems to be boiling away too quickly.


The risotto will be done when the rice is soft (not crunchy!) but still has a little bite to it--don't let it overcook into mush.  This should take approximately 20 minutes.  As it gets closer to done, add the broth in smaller increments so you don't accidentally end up with soupy risotto.  The goal is for a risotto that's still wet, but not runny and gross.


When the rice tastes just slightly underdone (approximately 2 minutes before it's done, according to Marcella Hazan--I guess you learn how to time it that exactly from experience?) stir in the second tablespoon of butter and the grated parmesan cheese, and stir!  Once it's cooked, remove it from the heat and add salt if needed.  I added at least a half teaspoon of salt, probably.  Don't leave this step out--the difference between under-salted and correctly salted was really obvious--all of the flavors become stronger, but it doesn't actually taste "salty."


Serve with additional grated parmesan on top.  Leftover risotto is significantly less delicious than fresh risotto, so eat up!  If you do reheat leftover risotto, be sure to add a little more water so it doesn't get dried out and gluey.  The internet tells me that you can make some sort of pancake out of leftover risotto, so perhaps that will be my next recipe!

Wednesday, February 3, 2010

Chocolate Beet Cake

What do you do with five pounds of beets? Obviously make them into cake.  This recipe (slightly modified) is apparently from Farmer John's Cookbook, but I found it in various places on the internet:

Beet Chocolate Cake:

4 oz unsweetened chocolate
3 eggs
1 cup vegetable oil
1 3/4 cups sugar
2 cups cooked pureed beets
1 T vanilla
2 cups flour
2 t baking powder
1/4 t salt

Bake at 375 F.


Begin by cooking enough beets to make 2 cups of puree.  We estimated randomly and ended up with the exact right amount, I advise doing the same.  Wash the beets, remove the tops and bottoms and any bad spots, and cut into quarters.  Place into a pot of water, and bring to a boil.  Simmer until the beets are soft (probably at least half an hour).  This probably removes all of the nutrients from the beets, but it's less of a pain than roasting them or cooking them in the microwave.

While the beets are cooking, melt 4 oz of unsweetened chocolate, broken into chunks, along with 1/4 cup of oil.  If you melt chocolate in the microwave, make sure to only heat it in short bursts and stir in between, or you'll ruin your expensive and formerly delicious chocolate.

After letting the beets cool a bit, remove the skins (pull them off if they come off easily, otherwise peel them).  Then puree!  A food mill works well; a blender or food processor would also do the trick.  And you are left with exactly 2 cups of beet puree.


Meanwhile, beat together 3 eggs and 1 3/4 sugar.  I recommend breaking the eggs perfectly in half:


Beat the sugar and eggs until they're fluffy, then mix in the remaining 3/4 cup of oil and the 1 T vanilla.  Next comes the most exciting part--adding the beets!  This actually is not a very exciting process, but will turn the batter into an exciting fuchsia color.


Mix for a while and enjoy the bright color, then pour in the melted chocolate.  I like to pour the chocolate in slowly because I'm always paranoid that the heated chocolate with cook the egg, and leave me with a batter filled with small pieces of scrambled egg.  There was a traumatic incident involving scrambled-egg-hot-chocolate when I was in college, that's all I want to say about that...but believe me, not at all delicious.


After the addition of chocolate, the batter continues to be an awesome purple/pink color that is somewhat disturbing.  Next, mix together the flour, salt, and baking powder, then add to the batter.  Mix just until the flour is incorporated, you don't want to overbeat the batter and end up with a tough cake.


After adding the flour, the batter should be a little lumpy, and now a weird purply-brown color, which means it's ready to bake!

Preheat the oven to 375F, and pour the batter into greased and floured cake pans.  I went with two 6" cake pans, plus a few cupcakes; the recipe would probably make at least one 9" round cake.  

Bake for approximately 40 minutes, or until a toothpick inserted near the center comes out clean.  Remove the cake from the oven and let it cool completely on a wire rack.


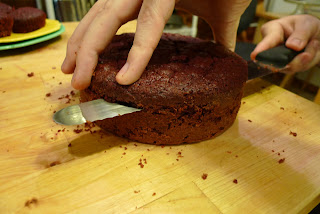
To make a layer cake, slice each cake horizontally with a bread knife.  Frost between the layers, and then cover with additional frosting.  Cream cheese frosting turned out to be delicious:

1 package cream cheese, softened
1/4 cup butter, softened
confectioner's sugar

Beat together the cream cheese and butter until smooth.  Add confectioner's sugar (at least 3 cups) until the desired frosting consistency is reached.  Add a small splash of milk if the frosting gets too dry.


If you want to feel like a giant, use a tiny spatula to frost your tiny cake!


Finally, this cake is best enjoyed in the sunshine, with a glass of milk.  The cake ends up slightly more red than a normal chocolate cake, and with the slightest hint of beets--although I'm not sure thatyou would immediately guess beets as the secret ingredient if you didn't know beforehand.